Monday, March 5, 2012

How to use Templates

     Templates are a great way to display your images. They can be a border for a single image or a multiple opening template to hold all your favorites in one. The one we are going to use today is my new Easter Template. It can be downloaded free by visiting my website, www.anartistview.net  Scroll down a little on the home page and you'll see the FREE link. Just click on it and you will be prompted to save the zipped file to your computer. If you are using windows, you should have a free zip program to open the file for you. If not, there are several free zip programs you can download and use. If you are having any problems with this email me and I'll send it to you in your email.
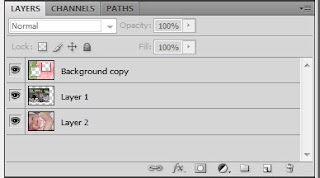
     Let's get started. Open your Free Easter Template. I'm using Photoshop cs4 but it will work just the same in Adobe Elements and many other editing programs. Now open two images you want to use for this template. In my layers palette I'm going to make sure the kids photos are behind (or below) the template layer.  Like this.
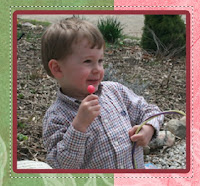
     Now we'll arrange and resize the images to fit the openings. Using the move tool, move your images to under the opening you want them in. Now use the transform tool to resize them. Control/ T will bring it up.  Remember to hold down the shift and alt keys together when resizing your image so it doesn't get all out of proportion. Let's do a little cropping next to make sure your image doesn't show in the other open window.  Using the rectangular marguee tool, let's select the area just outside the opening.  Next go to Select / Inverse so everything around your image will be selected. Next we'll go to Edit/ cut or easier yet....hold down the control button and press X.
     Resize the other image to fit and make sure you crop this one as well. Lastly be sure to save your work.
     There you have it. Now print and frame.
   Watch for more Free Templates coming soon to An Artist View Photography.

Tuesday, February 28, 2012

Adding a Sunset background

     Today we are going fix a sunset. This picture of Jenny and Dixie was taken on Lake Michigan late in the day. We didn't get to stay there and watch the beautiful sunset so I'm going to improvise.  I'm going to replace this grey day with a sunrise shot that was taken elsewhere on one of my trips.
     First I've taken the time to retouch out any unwanted items, sharpened the image and then cropped it to my finished size, a 5x7.
     I've opened up the sunrise shot and drug it over the top of this image. Sized it to fit so the horizons matched up pretty well. You don't have to be exact on this one. Just be sure it look believable.

     Then I masked this layer using the mask button on the bottom of this layer palette. (third one over from the left) This will bring up a white box next to the sunrise picture. We are going to paint on this mask with the black paint using a medium soft round brush. Don't worry is you make a mistake because you can always use the white paint to eliminate the areas where you went too far.


     Your layers palette should look like this now. I've blended the sunrise and the beach with a very large soft brush so there isn't any harsh lines. And we've got our new sunset.
     For a few extra touches try one of these to the sunset layer......
                     changing the blending mode in the layers palette
                     changing the opacity of this layer
                     changing the saturation


     As always.....have an artful day!

Textures and Backgrounds will be available soon from my website. Keep a watch out for Artiste Backgrounds.


Monday, February 20, 2012

Announcing Artiste Backgrounds


     Over the past two weeks I've shown you how easy it is to combine an image, a texture and a background. That got me to thinking about how I could make this even easier for you.The quick and easy answer, of course, was to make the backgrounds for you. I quickly went to work experimenting with background colors and brushes.  I now announce The Artiste Backgrounds collection.
     The image behind Megan is just one of a set of twelve backgrounds you'll be able to download and use with your artwork projects. I'll even include the master copy so you'll be able to change the color to whatever color will best match your image. I'll also include the step by step instructions on how to use them.
    I have a little more learning to do on website downloads but I'll be sure to let you know when I have the Artiste Backgrounds available on my website. www.anartistview.net
    

Monday, February 13, 2012

Editing a candid shot of a child

     Today I'm going to show you how to edit a child portrait. Here is a picture of my granddaughter Avery. She has such a beautiful smile but boy can she move. Like most kids, taking pictures of them is always on the run and you'll need to take hundreds of them just to get one descent shot.
     Let's start with cropping. I'll set my cropping tool to 8x10 at 300 resolution. I find if I work on an image at a larger size then when I have it printed at a smaller size it looks even better.
Now drag your cropping guide from the top left corner to the bottom until you get it right where you want it. I'm making mine a verticle to crop out Emma in the background.


     I need to adjust the image since the whites are a little muddy.  I'm going to use the curves tool. Press the Control +the  M key to bring up the curves palette. Looking at it shows my blacks on the left and whites on the right. My graph is not touching the right side so I'm going to slide the slider over to the left until it touches the first point of my graph. Press OK to apply your changes.

Now lets do a little editing. With children you shouldn't need to do too much since their skin is usually flawless. But Avery was running and playing so her face is a little red and there is a scratch on her neck to remove.  Using the cloning tool, set the mode to lighten, opacity at 25% and the flow at 100%. I'm also going to use a very soft round brush so I don't get any lines around where I'm retouhing. When you set the mode to lighten it will only lighted the areas that are darker then what your selection area is. You might want to try setting the mode to darken in order to darken some highlights if you need it.

     After Iwe even up the tones in her face, I like to use the unsharp mask. It's located under the  sharpen filter.

     For her eyes lets use the burn tool with a soft brush, range set to shadows and the exposure to 10 or less. I'm going to use this sparingly to go over her lashes and the dark areas in her eyes just to make them pop. One last thing, on a seperate layer I used a soft paint brush around the corners to create a slight vignette.
                     And there we have it. A finished portrait made from a candid shot.


Visti my website for more free tutorials.  www.anartistview.net

Monday, February 6, 2012

Adding a texture to an image


     Last week we started working on an image of a rose. We went over how to use a little dodging and burning to add that extra dimension. Today we'll go one step further and add a background texture.


     Let's open last weeks image. I'm using Photoshop CS4 but you can also use Photoshop Elements.


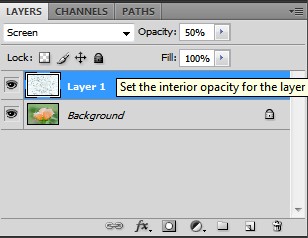
     I'll be using some textures I downloaded free from the internet. There are thousands out there and I love to have several to choose from. I keep them in a seperate file called textures so they are easy to find. I'll be using two today. The first one is called Aqueous_sun_textures_v2_027. It looks like a water splattered pattern. Now let's simply add it over my rose as another layer and set the layer style as screen  with the opacity to 50%. You'll probably need to transform the texture so it fits all the way over the rose layer using the transform tool. Sometimes I'll even make it bigger then the layer underneath if I want to use just a portion of the texture. Ok now that we have the texture above the rose, we'll need to mask out the part that is over the rose. You may want to leave it over the rose but for this print I want to elemenate it so that the rose stands out.
     Make sure the texture layer is highlighted and click on the layer mask icon on the bottom of your layers palate. A small box will show up next to it and we'll use this to mask out the texture with our black and white paint using the brush tool.


     Select a round brush with the hardness set to about 65%. I'm sure you'll want to adjust this as you go along the edge. The opacity should be set to 100? Using the black paint on the texture mask will hide the texture over the rose. If you make a mistake, don't fret over it because switching to white paint will bring it back. You may even try using a shade of grey to leave just a little bit in.
    

The texture looks good but I want to add another so over the top of this texture layer I'm adding another texture called aqueous_sun_textures_v2_023. This layer style is set at Pin Light and the opacity is set to just 35%. Then I did the same masking on this layer. This is how my layers palette looks now.

     One more thing...make sure you save your file before you flatten it. Then save it again as a finished print. That way you will always have a working file just in case you find you want to change something.
My final image looks a bit antique. How about yours? Any questions on this project or any others please feel free to ask. You may also reach me on my website, www.anartistview.net or join me on Facebook.
Have fun!


Monday, January 30, 2012

A Little Dodging and Burning will do.

      Here is an easy way to add just a little something extra to help an ordinary image become a little better. This first image is beautiful by itself but when I see it, I see the yellow in the background doesn't compliment the peach rose. Also the definition of the pedals isn't quiet enough. I'll use the dodge and burn method in a safe and easy way.
     First off bring up your image in Photoshop or Elements and do all the retouching you feel it needs. I was going for a softer look with this image so when I retouched the rose I made sure the exposure wasn't too dark. Then I took out the blemishes on the petals and slightly painted over the yellow in the background. Next I added a new layer above the original layer and filled it with 50% gray. At the top of the layer box I changed this layer to Overlay. Once you do this you will be able to see your original layer underneath. Now grab your paint brush tool and choose a soft round brush with the opacity set to around 10 maybe even lower. Now make sure your colors are set to the default of black and white. On this new layer paint with the black to make areas darker and then go back and paint with the white to make areas lighter. You'll get the hang of it pretty fast and what is really nice about this method is.....if you don't like what you are doing then simply fill the layer back in with 50% grey and start again.
     Now that you have that down......try  painting with another color. Have fun!

Monday, January 23, 2012

The loss of ceramic tiles


     For years now I've been able to sell ceramic tiles with my images on them. The mainly consisted of words composed with a flower designed in them as a letter. Customers loved them and needless to say I sold a lot of them. I used them in the kitchen as a spoon rest or as wall decor attached by simply adding a piece of velcro.
    I've been using the same company for years to order them and they have been doing a great job. But now they decided to up the price to the point where I simply cannot afford to buy them and then try to ask my customers to pay 1/3 more then they were in the past.  So the end is in sight for my little tiles unless I come across another company to make them for me at a low price without having to order 500 of each or put in a huge investment and make them myself. Which of course steels my creative time.

     So I'll keep searching for another avenue to purchase them. And if any of you know of a place, then please let me know.

     All the images will still be available on note cards. I will continue to make new ones like "Carrots" in that another company will come along.


Hideaway Hilda

Hideaway Hilda