
Templates are a great way to display your images. They can be a border for a single image or a multiple opening template to hold all your favorites in one. The one we are going to use today is my new Easter Template. It can be downloaded free by visiting my website, www.anartistview.net Scroll down a little on the home page and you'll see the FREE link. Just click on it and you will be prompted to save the zipped file to your computer. If you are using windows, you should have a free zip program to open the file for you. If not, there are several free zip programs you can download and use. If you are having any problems with this email me and I'll send it to you in your email.
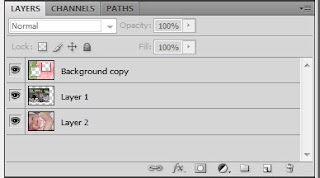 Let's get started. Open your Free Easter Template. I'm using Photoshop cs4 but it will work just the same in Adobe Elements and many other editing programs. Now open two images you want to use for this template. In my layers palette I'm going to make sure the kids photos are behind (or below) the template layer. Like this.
 Now we'll arrange and resize the images to fit the openings. Using the move tool, move your images to under the opening you want them in. Now use the transform tool to resize them. Control/ T will bring it up. Remember to hold down the shift and alt keys together when resizing your image so it doesn't get all out of proportion. Let's do a little cropping next to make sure your image doesn't show in the other open window. Using the rectangular marguee tool, let's select the area just outside the opening. Next go to Select / Inverse so everything around your image will be selected. Next we'll go to Edit/ cut or easier yet....hold down the control button and press X.
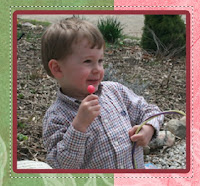
Resize the other image to fit and make sure you crop this one as well. Lastly be sure to save your work.
 There you have it. Now print and frame.
Watch for more Free Templates coming soon to An Artist View Photography.
 Let's get started. Open your Free Easter Template. I'm using Photoshop cs4 but it will work just the same in Adobe Elements and many other editing programs. Now open two images you want to use for this template. In my layers palette I'm going to make sure the kids photos are behind (or below) the template layer. Like this.
 Now we'll arrange and resize the images to fit the openings. Using the move tool, move your images to under the opening you want them in. Now use the transform tool to resize them. Control/ T will bring it up. Remember to hold down the shift and alt keys together when resizing your image so it doesn't get all out of proportion. Let's do a little cropping next to make sure your image doesn't show in the other open window. Using the rectangular marguee tool, let's select the area just outside the opening. Next go to Select / Inverse so everything around your image will be selected. Next we'll go to Edit/ cut or easier yet....hold down the control button and press X.
Resize the other image to fit and make sure you crop this one as well. Lastly be sure to save your work.

Watch for more Free Templates coming soon to An Artist View Photography.
